
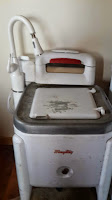
If you are like me, you can't help yourself when it comes to antiques. I love them! But what happens when they are a bit bigger than your average sit-on-the-shelf-display antique? Such was my dilemma with an antique washing machine. We had said washing machine around and I really wanted to display it in my home somehow. Because it was a complete Maytag clothes washer, the problem was that it would take up a lot of space. I thought it would make a nice addition to my laundry room/mudroom but I didn't want to waste any space there (my mudroom is one of the most utilized, necessary and appreciated spaces in my home!) Hmmmm. I decided that if I was going to make it fit into my home decor then it should be functional as well. I knew that returning it to its previous function as a clothes washing machine was beyond my expertise and i didn't have the budget to pay for a repairman with that particular skill set so I thought up another use for it. Since it already had a basin and a drain i decided to convert it into a laundry room/mud room sink-something I have wanted for years and haven't got around to installing. If you'd like some ideas on how to do the same, here's what I did.

1st I pulled out the central agitator, which in most models pulls right up and out nicely. Removing this piece makes the sink basin bigger, more accessable, usable and much more convenient fro when my husband or kids plop freshly caught trout in it or wash out their muddy shoes or clothes.


2nd After strategically setting a large bowl under the washer, I poured a pitcher full of water down into the basin to make sure it still drained correctly and didn't have any cracks or leaks. The old thing drained like a champ.
3rd I bought a cheap white faucet with a pullout nozzle that closely matched the enamel on my antique washer. My original plan was to cut or drill away some metal and mount the faucet right on the antique washer but I decided to preserve the washer in its entirety, without drilling or cutting, and go a different route.


5th I knew all my faucet hoses (including one long, weighted one) would not fit, slide and function very well in the tight space of the 3" pipe so I cut out about a third of the pipe, on the back side where it wouldn't show, with my saws all.
6th Because my pipe was gray, i decided to spray paint it and the cheap cap with white appliance paint to match the color of my antique.)


7th After the paint was dry I mounted the faucet onto the cap (following the instructions that came with the faucet). I then threaded the hoses on the faucet carefully down into the pipe and out the open slot on the back of the pipe.

 8th I secured the pipe to the antique washer using 2 very large and very cheap plumbing pipe clamps.
9th Time to do some plumbing! Attaching the faucet hoses to the sink hook ups was easy-they just screwed right on, hot to hot and cold to cold. The underside of the old washer was a slightly different story but with the help of my favorite local hardware store lady, it wasn't too tough either (Thanks Karen!). The drain pipe under the washer was a tiny, short metal pipe that protruded at a funny angle and was 3/4" in diameter. My p-trap and drain pipe in the wall that I needed to connect the washer to was 1 1/2" black plastic plumbing pipe. Hmmmm. First, I bought a rubber hose and clamp connector set for a one-size-fits-all dishwasher/garbage disposal unit and connected it to the metal drain pipe. These wonderful little connectors start at 1/2 " on one side and end at 1" on the other. I cut sections off the small end of the rubber fitting with a pocket knife until i had a piece that fit nicely over the washer's drain pipe. One side attached!!
10th From there I had to grab an adapter or three to stick into the 1" rubber hose, then connect into a 1 1/2" black pipe. With the funny angle of the drain pipe under the washer, this took a few 90, 45 and 22 1/2 degree elbows of black plumbing pipe, but it did come together! After glueing and clamping the pieces in place it was time to try it out!
Sink, faucet and drain all work great and we love it in our mudroom! If you give this a try, I hope you have as much fun with it as I did! (If my leftover parts and plastic pipe is a bit too "rustic" for you, there are many other options available and if you'd like to discuss them with me, let me know and we'll chat about them.)
Sink, faucet and drain all work great and we love it in our mudroom! If you give this a try, I hope you have as much fun with it as I did! (If my leftover parts and plastic pipe is a bit too "rustic" for you, there are many other options available and if you'd like to discuss them with me, let me know and we'll chat about them.)

No comments:
Post a Comment