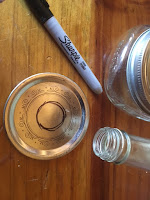
First I needed a screw-cap bottle and lid. I punched an x-shaped hole in the lid with a chisel and small hammer and then opened it up wide.
Then I unscrewed the ring and lid from the mason jar and tipped the empty bottle upside down on the top center of the mason jar lid. Using a sharpie, I drew around the top of the bottle.
I then drew the other places on the lid that I would be cutting out. The birds would need to feed from the top of the jar through the lid where the seed reservoir would be-the inside of the small jar itself. The problem was that I needed the lid to be tough enough to support the weight of the mason jar (and the birdseed and birds) with all the possible surface area cut away to allow the birds easy access. I decided to leave four small little strips of mason jar which would extend from the center hole to the edge of the lid. After drawing my plan on the top of the jar with sharpie and leaving a little bit extra to fold down so that no sharp edges would be left, I got to work with the chisel agin.
Once I had cut and folded back the sharp edges, I screwed the ring and lid onto the bottle end. Then I screwed the mason jar on the ring and lid.
Now for the wire hanger! I have a bunch of stiff wire (the same that I use for the hummingbird feeders) and so I bent it carefully around the bottle and hooked the end. Finished!
Except that I needed to take the jar back off to fill it with birdseed. I loaded the bottle and screwed the jar back on and I was in business! I hope you like it and have fun making your own variations!


No comments:
Post a Comment