Monday, February 22, 2016

DIY make your own inexpensive library ladder for your bookshelves

   
 I've always had a fascination with library ladders.  They have always just seemed awesome!  I guess it's an easy leap to make as I love books and libraries and bookshelves. When my husband and I got married we realized that between the two of us we had thousands of books and both of us were stubborn about keeping our several hundred favorites of differing shapes, sizes and degrees of shabbiness.  Yikes!  What to do with all of those books figured into our house designs when it came time to build our own home.  Our living room plans changed into a library/living room and every free wall changed into a bookshelf-most with closing doors to hide the mix-match of textbooks of every subject, worn classics, coffee table books, favorite novels, children's books, family photo albums and scrapbooks.  One of the problems with that was that we had planned the entry into the kids' loft along a wall now designated as a library bookshelf.  I was tasked with figuring out a way to make some sort of staircase entry into the loft while keeping as much bookshelf as possible.  My solution was something I've always wanted anyway: a library ladder!


     The bookshelf itself needed to be functional but structurally strong enough to hold the ladder weight and the weight of the kids and my husband and myself.  I am no great craftsman so for the bookshelf construction I turned to a local family who specializes in this sort of thing-"Generations Cabinetry." (They are not on the web!  If you are in the Southwest Wyoming area call Bruce at 307-679-0122)   They put up with me and my crazy ideas and built us an amazing set of shelves & cabinets that are also our main entry into the kids' loft.
     (Side note: Even though our bookshelves were custom made, I think these simple ideas for building and securing a library ladder could work for most bookshelves!)


 I told them I would deal with the hardware and ladder myself and so this blog is about how I did just that with recycled lumber and some inexpensive hardware.  (My husband and I made the pulls on the cabinet doors on our bookshelves out of discarded railroad spikes.  To see how, go to my post on railroad spike cabinet pulls )

1st I realized that my ideal ladder on wheels idea needed to be re-examined- I needed a ladder that was less moveable so nobody would get pushed for a wild ride while trying to climb up!  (I know my kids.)  I did want to be able to re-position the ladder though, just not while someone was climbing on it. (Out go the industrial strength wheels and rollers!)  Hmmm.  I decided that I needed a metal pipe or runner of some kind to hold my ladder just far enough away from the wooden bookshelf to not scuff it while allowing some limited movement of the ladder from one side to the other.  I chose some simple screw-in bookshelf supports and a decorative curtain rod that adjusted to the width of my bookshelf.  My husband and I wanted to make sure that the curtain rod was sufficiently strong so we pulled it open, measured the inside diameter and purchased a smaller metal rod to go inside and add more core strength.  (A regular metal pipe or conduit would've worked fine with little or no re-enforcing required, but we wanted some fancy end caps and found that curtain rods had more selection on that score.)
2nd we attached the shelf supports to the bookshelf and then measured on the curtain rod where the holes in the shelf supports lined up.  We drilled through the curtain rod and core and secured the curtain rod to the shelf supports with a few bolts and nuts.

3rd With the rod in place and secured to the bookshelf it was time to work on the ladder itself.  I took some measurements and drew up my plans based on what I thought would be ideal for this particular situation (and the materials that would be inexpensive or that I already had on hand).  I needed some hooks now, instead of rollers, that would hold the ladder in place securely while someone was on the ladder but that would allow me to move and adjust the ladder when no one was on it.  They needed to be strong enough and long enough to keep the ladder on the bar safely.  I made my sketch and got to work!

I knew I had some lumber odds and ends so I planned accordingly.  I also know that my childrens' little legs might have trouble with ladder rungs placed too far apart so I planned a ladder with rungs slightly closer and easier to navigate than a typical hardware store ladder.
4th I hunted around until I found some previously used 2x4 boards.  I found several that had been used as bracing and other temporary fixes during our house construction.  I love re-using and re-purposing lumber and when all it costs me is the time it takes to pull a nail or two, I am loving it.

5th I placed my long side pieces (called stringers) against the bookshelf at the angle/steepness I desired the ladder to be and used my tape measure and small level to get the steps at the correct angles and distances apart that I had chosen.

6th Once I had the angles drawn with pencil,  I used my circular saw on its shallowest setting(1/4") to cut into my stringers where the steps/rungs would go.  After running the saw through several times, I finished cleaning out the space with a hand chisel and hammer.  I used my cross cut saw to cut my stairs/rungs all the same length and began piecing together my ladder. I decided I would pre-drill all the holes I would require to attach my handrail and screw the steps/rungs into place before I tried to finish/stain or lacquer my ladder.

7th I decided to call up my cabinetry folks again and ask them for the color of stain they had used on my bookshelf so I could match it.  I was going to try to router the edges of my steps as well as the stringers, stain and lacquer them up and then screw everything together.  These kind folks, offered to router, stain and lacquer everything for me so that my ladder would "fit" the design and stain of the bookshelf exactly.  They did a great job at a very affordable price and I was excited by the result-I've got to admit it was much better than my job would've been.  (They even went so far as to give me an extra wooden rung or two just in case, and put it all together for me, minus the handrail that I was still working on.) Thanks Trevor and Bruce!

8th While my ladder was getting routered, stained and lacquered up, I turned my attention to my handrails, hooks and braces.  I felt that a metal pipe for a handrail would be easier for little hands to hang onto than a 2x4 or 2x2.  So I walked into my local hardware store and found 2 steel pipes about 10ft long and 3/4" in diameter.  The ends of the pipe were sharp so I grabbed 4 rubber chair leg covers with the appropriate diameter so that they would fit snugly over the rough metal ends.
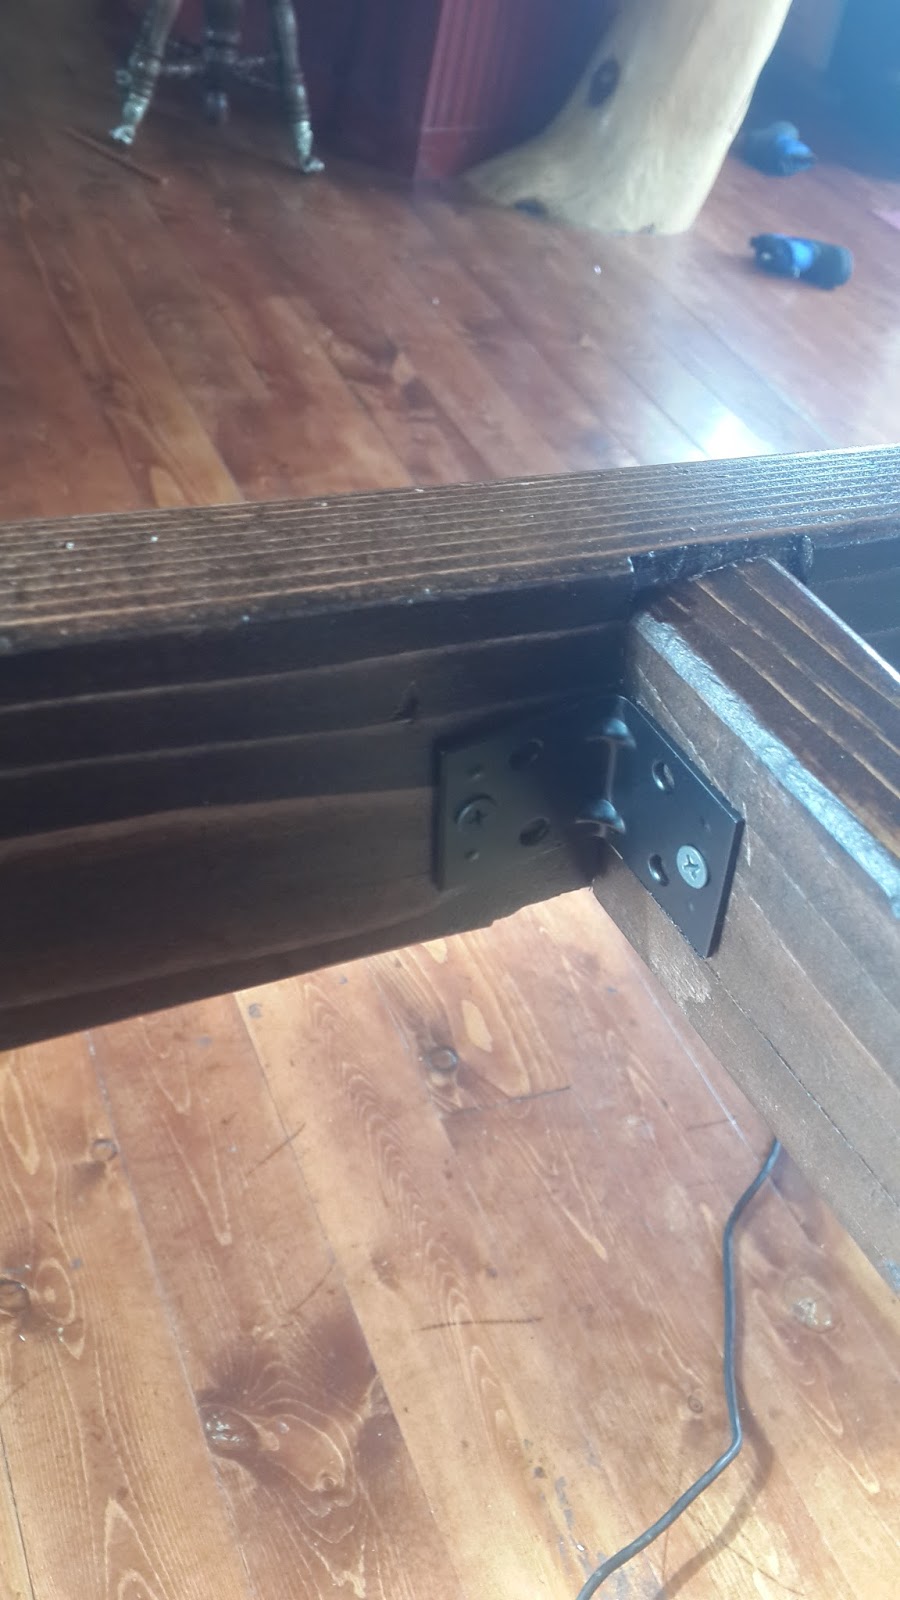
 That done, I found four, 7" long 1/4" diameter bolts with washers and locking nuts and four, 1 1/2" long spacers with 1/2" diameter.  I wanted the smooth spacers to hold the handrail just far enough away from the ladder to make it comfortable for little hands (and my own as well) to grab the railing.  Next I hunted down some corner braces to screw under each stair rung to re-enforce them so that they could easily handle the weight of someone as large as myself or my husband (or both of us together hauling furniture items up the ladder).
That done I started looking for metal hooks.  I couldn't find a type of hook that I wanted for my ladder (to hang onto the bar on my bookshelf) so I picked up a plain metal strap about 30" long and 1 1/2" wide and about 1/8" thick to make some custom hooks myself. I took them all home and spray painted everything black (except the strap and long pipes) to match the hardware I had already for my bookshelf.


9th Next I picked up my ladder all stained and pretty and measured on my metal pipes where I wanted my handrails to fit.
I had already pre-drilled holes in my ladder so I just marked on each pipe where the holes needed to be drilled and got to drilling.  I had some extra pipe lengths to cut off- a task easily accomplished with my hand grinder (my favorite power tool!) and the metal cutting disc attachment- and so while I was at it I cut my metal strap in half as well.  That done I set my straps aside and painted the newly drilled and cut to length handrails a nice black to match my other metal pieces and pulls.


10th Once my metal pipes had dried, I attached my handrails!  I couldn't wait to see what the ladder would look like propped up against the bookshelf at this point so I hauled it upstairs and showed it off to my kids, nieces, nephews and my husband, who all tried it out.  It was at that moment that my husband requested that the ladder be about 4-6" narrower and one more step added at the top of the ladder for the convenience of the little ones. So... back to work!
After I un-screwed everything, measured for the new top step, cut a space for it with my circular saw , chiseled out the rest, measured and cut each rung 5" shorter and added a new rung, I put it all back together, hauled it back upstairs and got the thumbs up to finish!)

11th I added my nicely painted corner braces under each step for additional support.  (I was glad I had waited 'til now to screw them on!)

Just a quick side note here:  to make the metal screw heads match my new black paint job, I used a black paint pen, but I have used a black marker before and had similar results.
12th I took my metal straps out to the vice and secured one end in the vice. I bent the straps by hand over a scrap piece of pipe the exact same diameter as my curtain rod.  That done, I drilled several holes in the areas where I wanted to secure the straps/hooks to my ladder.
13th Next it was time to paint!  After the straps/hooks had dried, I used my drill and secured the hooks to the ladder.  At this point I decided I wanted to put a soft surface between the hooks and the rod so I added a couple of peel and stick felt bumper strips to the inside of my hooks.

14th Time to throw it back up and survey the scene!  We love the ladder and the hardware!  Here's hoping that this was helpful and that your projects are fun and rewarding too!

Monday, November 9, 2015

What we do with venison

The girls here at Dirt Road Renaissance are ranch raised.  We grew up eating beef, pork and lamb that we raised on the ranch.  With a plentiful supply of those meats, I didn't see the need for supplementing our freezer supplies with venison, but my husband has developed the desire to hunt, which leaves me to find ways to put that meat to use.

 The biggest challenge with harvesting wild game is keeping the meat clean.   I spend a lot of time washing and picking hair off of our meat before I ever get started on processing.
Our first year, we made jerky and pepperoni sticks out of our deer.  The next year, we saved a few steaks, made jerky and pepperoni sticks, tried to make summer sausage and put a lot of meat in bags in the freezer to deal with later.  Later didn't come until almost a year later when I finally pulled it out and made bratwurst.  This year my husband added an elk to our harvest and we are turning it into steaks, roasts, burger and jerky.

We have had a mix of successes and failures:

Jerky- We have tried many different flavors that we bought and attempted a few of our own recipes.  My husband likes to add brown sugar to any mix, but I prefer the original and mesquite jerky flavoring that we buy. You don't need any special equipment to make jerky,  but a slicer makes it much easier to cut to the proper width.  We use our oven to cook the jerky, but a smoker works great too.

Pepperoni/snack sticks- The kids love these.  Also made from a store bought mix.  You need a grinder and sausage stuffer to make them, but they can be cooked in the oven or smoker like the jerky.

Summer sausage- We tried a recipe found on the internet, but it didn't turn out well.  It has the consistency of hamburger with summer sausage flavor.  I hate to waste food, so I mix it in sloppy joes and nobody can tell. (Shhhh) This also requires a grinder and sausage stuffer.

Bratwurst and pepperoni sticks
Bratwurst- I was very excited to buy a brat mix for wild game and froze some venison specifically for making some.  I was disappointed to realize that the recipe called for mostly pork meat with just a little venison thrown in. I learned that it is important to keep the ingredients very cold to keep it from becoming an unappetizing mush when stuffing the casings.  The result is still quite good, although I recommend cooking with a meat thermometer to make sure it reaches 165 degrees and then immediately remove from the heat.  Otherwise, they dry out.  Since I still have some seasonings and casings, I hope to play with that pork/venison ratio to see if I can make them more on the venison side.  These also require a grinder and sausage stuffer, but you can cook them however you would usually cook fresh brats.

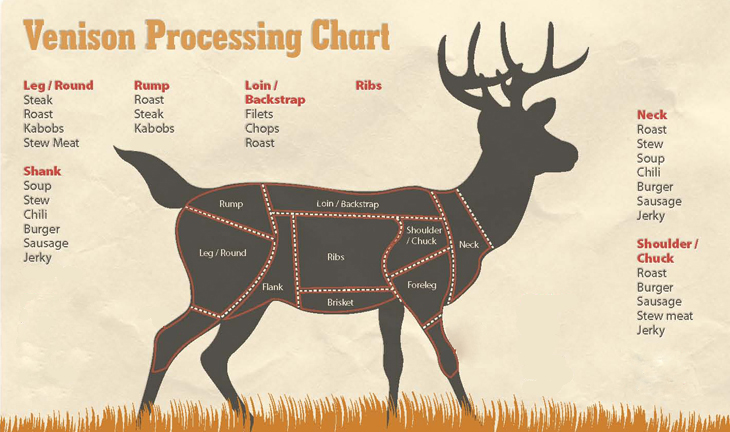
Steaks/ Roasts/Burger- We processed our deer and most of our elk from this year into steaks, roasts and burger.  The backstrap and tenderloin are the most tender muscles in an animal, so we cut this into our steaks.  We saved some meat from the rear legs for roasts and froze some to make into jerky later.  Everything else we cut into small chunks and ran through a grinder with some pork fat that I had in the freezer for burger. The pork fat is not necessary, but I am of the opinion that pork makes everything better.


We have tried quite a few things with our wild game and we will continue to try new things for as long as my husband wants to hunt. (Soon my son will be joining in as well)  However, we did something new this year that I think is my favorite way to deal with the venison that they bring home.  We heard about a few families in our area that are going through difficult times.  We offered our deer to anyone that wanted it and then cut and packaged it into steaks and roasts and burger to be delivered to those families.  I found this link for those wanting to donate their game meat to others in need.  Hunters Feed  Knowing that the meat was going to people who could truly use it made the time spent cleaning, cutting and packaging feel much less of a chore.  We will probably continue to donate all or part of our hunting results in the future.

Hopefully I have given you some ideas for how to deal with the wild game that may come to your kitchen.

Sunday, June 7, 2015

DIY Make your own homemade fishing lure for trout out of a penny

When I was a kid I loved to fish but hated using worms or grasshoppers... or any kind of bait really.  The first time i saw someone fishing the river by my home with a lure was an eye-opening experience.  I was impressed by the fact that only the trout in the river were attracted by the lures.  With my live bait it was always a gamble to see what would bite, a trout, a bony white fish or the more likely "sucker fish" that all called the river home.  I had no idea how to fish with a lure, but I was sure I wanted to fish with them from that day forward.
The problem for me was the price.  I was just a kid and couldn't afford the nice lures that I'd seen work so well to pull trout out of the river.  After examining some in the store, I decided it wouldn't be hard to make my own.  I "borrowed" some of my little sister's awful, plastic beads, dug out a penny and with the help of a nail, a paperclip and an old rusty treble hook that I found inside my older brother's abandoned tackle box, I had my lure!
Shockingly, it worked on its maiden voyage and I caught 2 fish before hopelessly snagging my penny lure, loosing it and coming home.  Even though I'd lost my lure, I came home triumphant.  I'd only lost a penny really, and I'd gained 2 fish.  The biggest problem was explaining to my little sister what happened to her jewelry. (I think she has finally forgiven me.)
So to make a short story long, this blog is here to show you how to make a simple, but effective, homemade, trout lure or if you'd prefer, provide you a link to buy your own penny lure and instruction sheet.  (a great novelty gift idea for kids to keep them busy in the summer)

First, dig a penny out of your couch cushions, find a medium-sized paperclip, some beads and a treble hook (I've used regular hooks before and they will work, but not as well as a treble hook I think).

Second, take a small hammer, rounded if you have one, and pound your penny on a piece of scrap wood or a wood block until in has a concave/convex (spoon-like) shape.

Third, as close to the edge as you can, drill through the penny with a small diameter drill bit. If you don't have a power drill at your disposal, you can do as I did as a kid and use a hammer and small nail to make your hole through the penny.  Do your best to smooth out any rough edges on the hole so that the penny can move uninhibited as it spins through the water later.

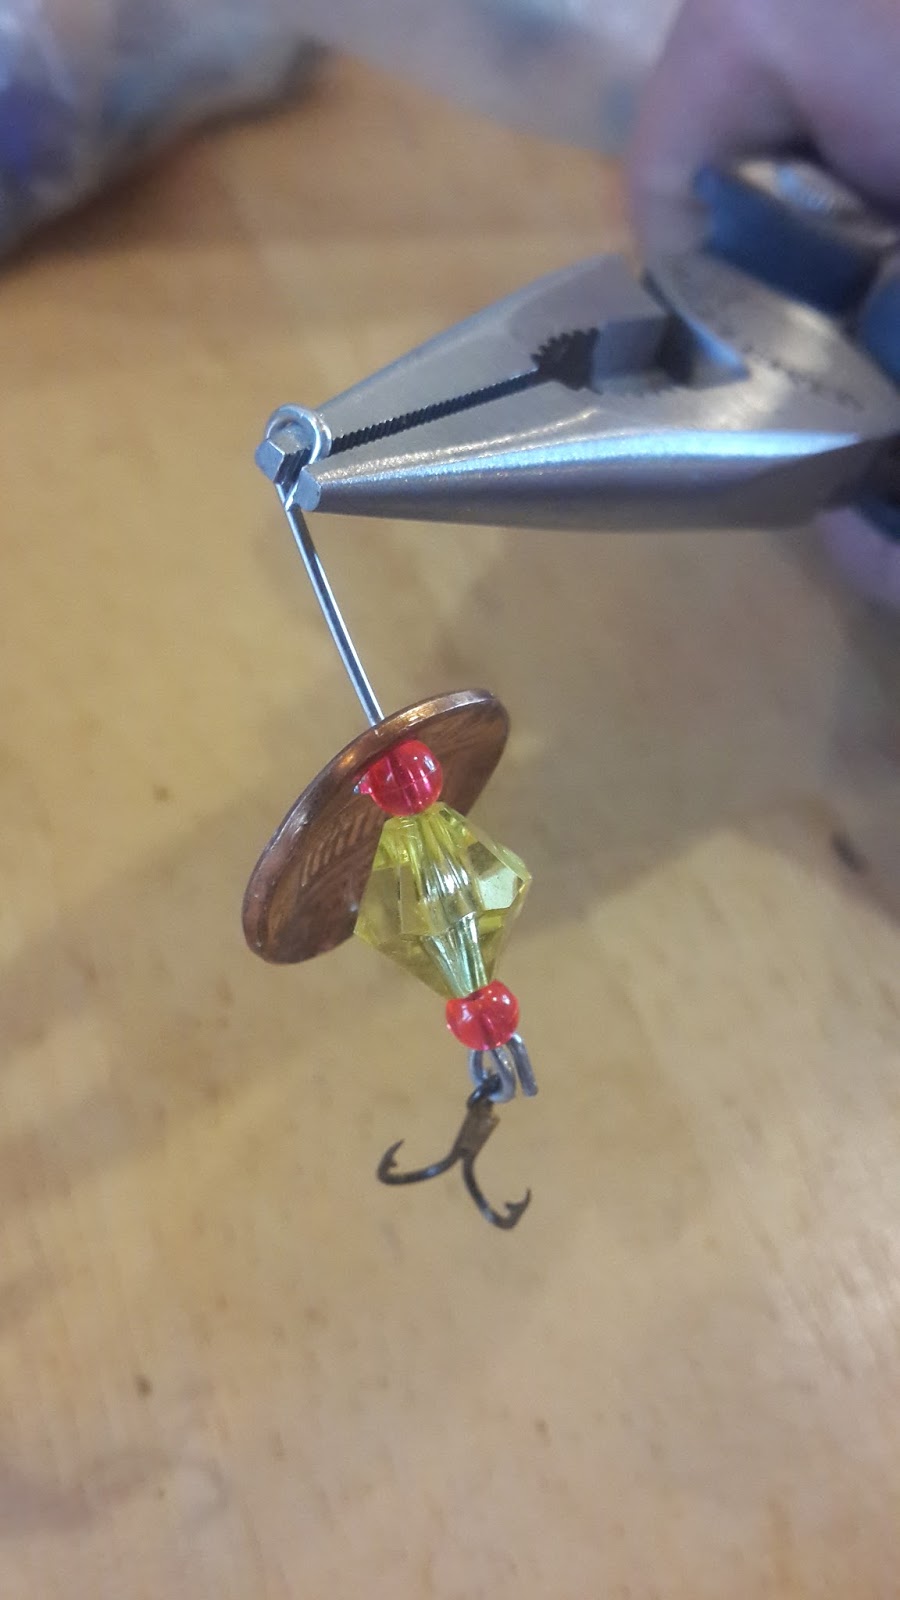
Fourth, straighten out your paperclip and using needle-nose pliers, make a hook at the end.  Place the treble hook on the hook and using the pliers again, bend the end of the paperclip around to close the hook, making a tight loop.

Fifth, string the bead or beads on the paperclip as desired and thread the penny on, concave side down so that it spoons around the beads.

Sixth, clip off any extra paperclip, leaving about 3/4 of an inch above the penny and beads.  Make a tight loop with the top end of the paper clip for your fishing line or swivel clip to attach securely onto.


Seventh, go try it out!  Make sure the penny can spin freely on the paperclip to attract your trout.  You may also need to add some weights/sinkers to the line to help things along.
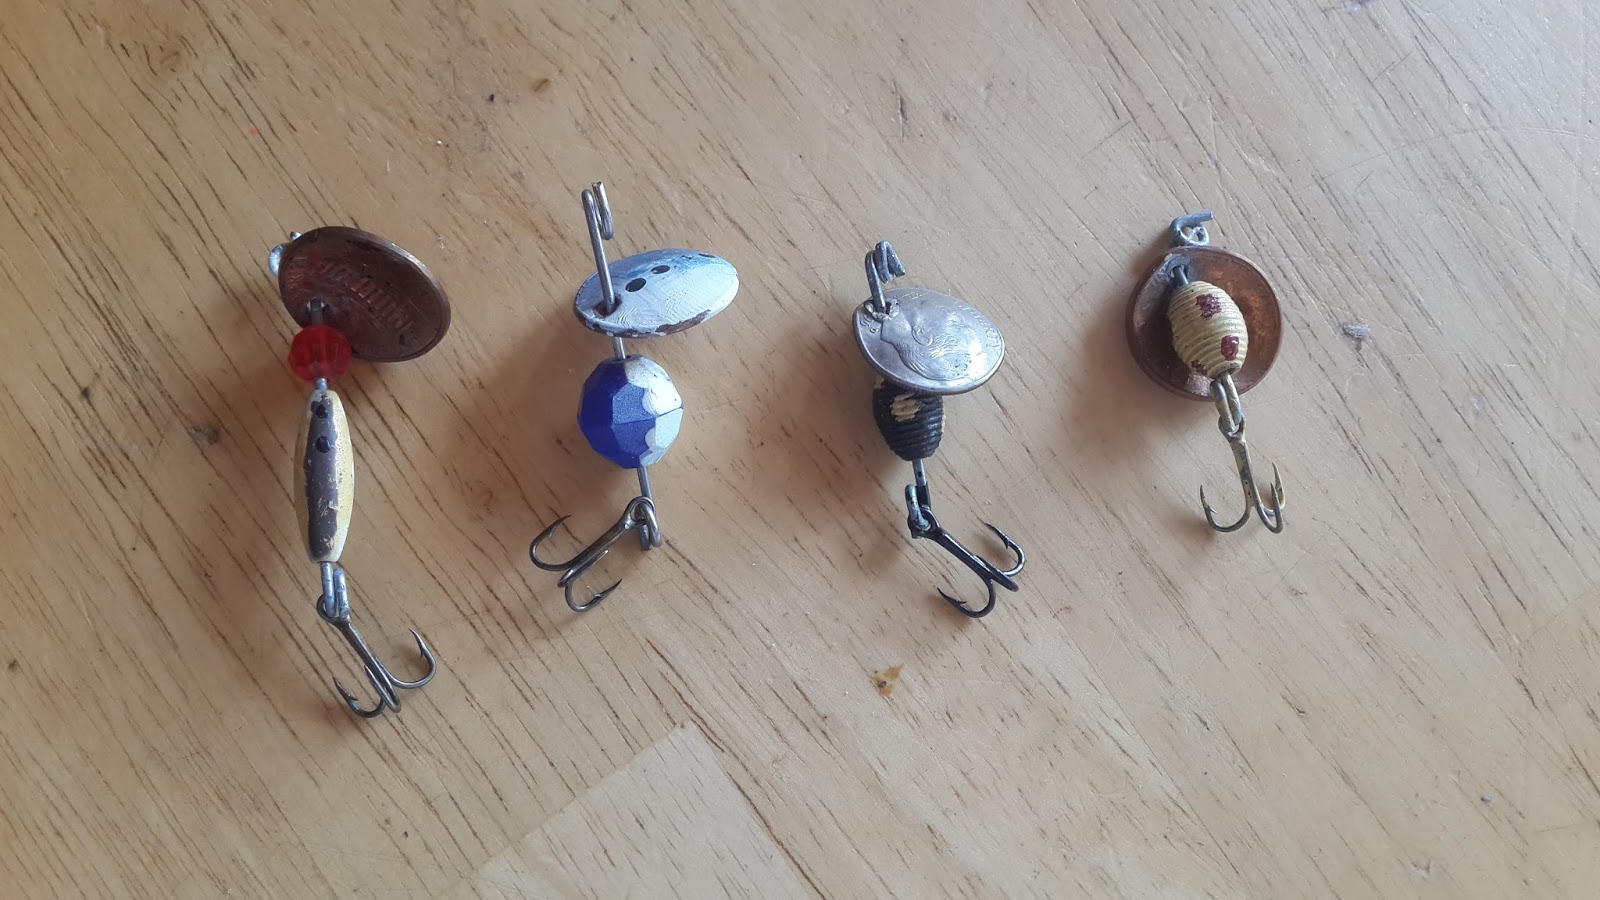
Have fun designing your custom homemade lures and good luck!  I hope you have as much fun as my kids and I have making your own lures.  I will include some of my favorite lure designs for catching the rainbows, cutthroats and brown trout varieties that are native in our rocky mountain rivers here.
If you'd like to make them, but maybe another day, click this link to buy your own penny lure accompanied with an instruction sheet on how to make your own.

Friday, May 15, 2015

Make your own homemade Hummingbird Feeders-building with recyled and re-purposed bottles, jars and homemade feeding tubes

My grandparents all loved native birds, consequently, their homes, gardens and yards were constantly surrounded by beautiful birds who frequented the many feeders that were strewn about.  It amazed me that they knew all the names of the colorful and distinctly different little feathered visitors who came to dine outside their windows.  My only surviving grandmother still hangs out her feeders and can tell her great grandchildren all about the birds that they see all around her home.  Hummingbirds were a favorite of mine with their wings going a mile a minute as they hovered with their delicate beaks deftly extracting nectar from the feeders.

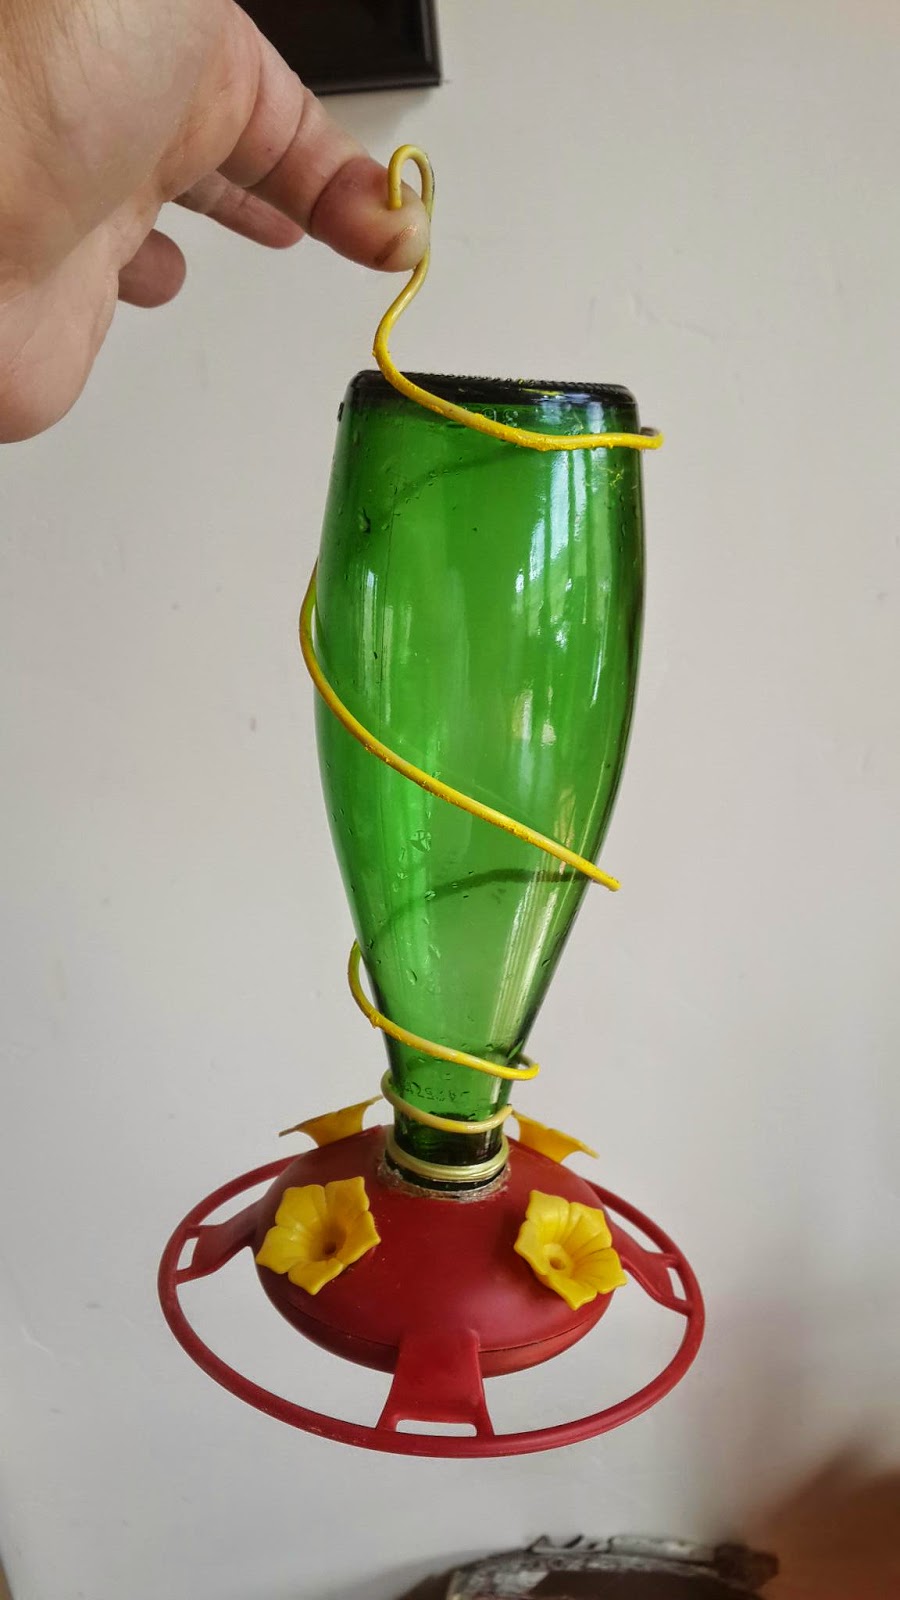
Now that I am grown I hang out my own feeders and I enjoy building my own.  If you enjoy hummingbirds and enjoy making your own feeders, I hope you will enjoy this and find it helpful. I have a couple different designs that I have built but I will start with a popular design right now that uses bottles from wine, sparkling juice, soda and even mason canning jars with a feeder tube (or two, or three or four) attached.  There are many places that sell pre-made feeder tubes but I made my own using things I had on hand and it was simple and of course much cheaper.  I am going to try and link this blog to a site online where you can also purchase these great recycled feeders if you choose.

1st I drank a bottle of sparkling juice with my kids and husband over a pot roast dinner and saved the bottle.  This particular variety of sparkling juice had a twist on and off cap so I decided to use that to my advantage (but I will also show ways to make feeder tubes that will work with bottles that do not have resealable caps). 2nd I looked around the house and found some extra, flexible,  plastic tubing lying around.  (Truth be told it was some old oxygen tubing that my son required when he was born.  Thank heaven he no longer needs it for its original purpose, but he does love watching birds outside so I thought re-purposing the tubing for a bird feeder was perfect!)   If you have some flexible copper tubing or anything similar it will work fine too.  I cut the tubing into about 6" sections and then dug through my drill bits looking for a bit that was the same diameter as my tubing-or at least fairly close.


3rd Once I found the drill bit I attached it to my power drill and bored a hole through the center of the screw-on cap and inserted the tubing through it.  I've heard some people say the tube should be about 2" inside the bottle and 4" out, but I only put the tube in about an 1" or so inside the bottle.


4th Even though the tube fit snugly into the drilled hole of the cap, I fired up the hot glue gun and put a bead around the tube both on the inside and outside of the cap to seal it up. (For non-resealable caps, I simply used a cheap cork, drilled through it, just as I did the twist-off cap, inserted the tube inside with about an 1" inside the bottle and about 4" outside, then sealed it up with hot glue exactly as i did with the cap.  Keep a steady hand when drilling the cork as it is soft! )

5th I didn't want bees or other insects crawling up into the tube and I wanted the opening of the tube to be small enough to prevent excess leaking.  After some thought, I used some colored electrical tape (hummingbirds are supposed to be drawn to the colors red and yellow) and covered the end of the tube with a small piece,


then secured that piece by wrapping a little electrical tape around the outside of the end of the tube.  With the end of the feeder tube successfully sealed off, I poked a small hole through the tape on the end of the tube with a paperclip and wiggled it around so that it was about the right size for a little hummingbird beak to fit.

6th I needed a hanger!  I had some twine around which would work fine, but i decided to use some stiff wire we had out back that is so miserable to bend that no one ever uses it to fix fences or wire up anything.  I like being able to put things to good use and it seemed stiff enough to do the job well.  It took a while, using pliers, the bottle and my tabletop to start a nice, curving, spiraling wrap that was small enough on one end to carefully cradle the bottleneck and gradually large enough on the other end to hold the rest of the bottle securely and still have enough left over for a nice hanger.  (I used about 30" or so for my large sparkling juice bottle.)


7th I decided to spray paint the old gray wire that i fashioned into a hanger to dress it up a bit.  I had a copper color that would match the cap so i used it and loved it-but this is obviously not a necessary step.  Lastly I wiggled the bottle into its new hanger and project done!   All ready to be filled with nectar, hung up in a nice spot and enjoyed!  (One tip about filling the bottle, try to fill it as full as possible and let all the air bubbles rise to the top before securing a cap or slowly twisting a cork with feeder tubes attached.  This prevents any excess leaking although with the tiny holes on the ends of these tubes, I haven't had many problems with that!  Please do remember though that in high wind areas, all feeders will leak.)
Any bottle with a tight sealing, screw on cap (or cork) can be converted easily, like this mason jar.  The same process is used: drill through, insert tubes, add a hot glue seal, tape the ends, poke tiny holes in the tape on the ends and make your hanger.
I found that in areas where the hummingbirds are not familiar with the single-tube feeders, I had more success adding a colorful plastic flower made of colored electrical tape to the end.   To reduce any excess leaking, I found it was also helpful  to wrap small lengths of pliable, left over copper electrical wires around the tubing to point the ends up.
(NOTE: To avoid any leaking or excess dripping with your feeders, fill them up absolutely as full as you can and let all air bubbles rise to the top.  Slowly screw on the tops or twist in the cork.  Improper filling can make your feeder drain out in a day or less.)
If you would rather purchase these great recycled creations today and make them another day, I am attempting to create a link here.


It can also be fun to give your old feeder some new features.  I accidentally broke the old plastic bottle on this one and simply re-fitted it with this perrier bottle and made a new hanger for it.  The "re-fitting" process required boring a larger hole just the size of the perrier bottle cap, drilling a hole through the bottle cap to allow the the nectar to run into the feeder and hot glueing the outside of the cap into the newly bored hole.  Now the bottle simply screws in or out of its cap in the feeder base and is easy to refill.
I have a few other designs for feeders that I will try to post pictures of below and If enough folks want to see how to make them, I may post the directions in a later blog or simply make an addition to this. one


The Repurposed Home: DIY converting an antique clothes washer into a mudroom sink

If you are like me, you can't help yourself when it comes to antiques.  I love them!  But what happens when they are a bit bigger than your average sit-on-the-shelf-display antique? Such was my dilemma with an antique washing machine. We had said washing machine around and I really wanted to display it in my home somehow. Because it was a complete Maytag clothes washer, the problem was that it would take up a lot of space.  I thought it would make a nice addition to my laundry room/mudroom but I didn't want to waste any space there (my mudroom is one of the most utilized, necessary and appreciated spaces in my home!)  Hmmmm.  I decided that if I was going to make it fit into my home decor then it should be functional as well.  I knew that returning it to its previous function as a clothes washing machine was beyond my expertise and i didn't have the budget to pay for a repairman with that particular skill set so I thought up another use for it.  Since it already had a basin and a drain i decided to convert it into a laundry room/mud room sink-something I have wanted for years and haven't got around to installing.  If you'd like some ideas on how to do the same, here's what I did.


1st I pulled out the central agitator, which in most models pulls right up and out nicely.  Removing this piece makes the sink basin bigger, more accessable, usable and much more convenient fro when my husband or kids plop freshly caught trout in it or wash out their muddy shoes or clothes.


2nd After strategically setting a large bowl under the washer, I poured a pitcher full of water down into the basin to make sure it still drained correctly and didn't have any cracks or leaks. The old thing drained like a champ.

3rd I bought a cheap white faucet with a pullout nozzle that closely matched the enamel on my antique washer.  My original plan was to cut or drill away some metal and mount the faucet right on the antique washer but I decided to preserve the washer in its entirety, without drilling or cutting, and go a different route. 


4th I had some left over 3" plastic conduit pipe and so I bought a .75 cent cap for it and decided to mount my new faucet on the pipe and cap (which I would in turn attach to the antique washer).  I measured the height of the washer and cut the pipe to match.  I measured the size of hole that the faucet would need and dug out an old drill bit with the same diameter.  I drilled through the cap carefully and filed down the rough edges.


5th I knew all my faucet hoses (including one long, weighted one) would not fit, slide and function very well in the tight space of the 3" pipe so I cut out about a third of the pipe, on the back side where it wouldn't show, with my saws all.


6th Because my pipe was gray, i decided to spray paint it and the cheap cap with white appliance paint to match the color of my antique.)

7th After the paint was dry I mounted the faucet onto the cap (following the instructions that came with the faucet).  I then threaded the hoses on the faucet carefully down into the pipe and out the open slot on the back of the pipe.

8th I secured the pipe to the antique washer using 2 very large and very cheap plumbing pipe clamps.


9th Time to do some plumbing!  Attaching the faucet hoses to the sink hook ups was easy-they just screwed right on, hot to hot and cold to cold.  The underside of the old washer was a slightly different story but with the help of my favorite local hardware store lady, it wasn't too tough either (Thanks Karen!).  The drain pipe under the washer was a tiny, short metal pipe that protruded at a funny angle and was 3/4" in diameter.  My p-trap and drain pipe in the wall that I needed to connect the washer to was 1 1/2" black plastic plumbing pipe. Hmmmm.  First, I bought a rubber hose and clamp connector set for a one-size-fits-all dishwasher/garbage disposal unit and connected it to the metal drain pipe.  These wonderful little connectors start at 1/2 " on one side and end at 1" on the other.  I cut sections off the small end of the rubber fitting with a pocket knife until i had a piece that fit nicely over the washer's drain pipe. One side attached!!
10th From there I had to grab an adapter or three to stick into the 1" rubber hose, then connect into a 1 1/2" black pipe. With the funny angle of the drain pipe under the washer, this took a few 90, 45 and 22 1/2 degree elbows of black plumbing pipe, but it did come together!  After glueing and clamping the pieces in place it was time to try it out!
Sink, faucet and drain all work great and we love it in our mudroom!  If you give this a try, I hope you have as much fun with it as I did!  (If my leftover parts and plastic pipe is a bit too "rustic" for you, there are many other options available and if you'd like to discuss them with me, let me know and we'll chat about them.)